
 ENG
ENGMMP Setup for ROAS
Introduction
Tapjoy offers Return on Ad Spend (ROAS) reporting to customers via the Tapjoy Reporting API and the Tapjoy Dashboard. The calculated ROAS metrics take into account an Advertiser's Ad Spend and Revenue from In-App Purchase (IAP) data and Monetization Ad Revenue when available.
For ROAS purposes, we treat an in-app event with an associated purchase value and USD currency code as IAP, meaning it will be counted in calculating ROAS for that campaign. It is critical to ensure that Tapjoy receives your app’s IAP data properly through a Mobile Measurement Partner (MMP) to have accurate ROAS metrics for reporting and optimizing your campaign performance. Similarly, Ad Revenue data from your acquired users must also be passed to Tapjoy via a MMP in order to be included in ROAS metrics.
This page provides information on how Tapjoy receives IAP and Ad Revenue data, the benefits to you, and best practices on setting up data forwarding with your MMP.
How and Why Revenue data is collected
The primary source of incoming IAP and Ad Revenue data to Tapjoy is from MMP partners. As part of onboarding your app and setting up campaigns with the MMP, you’ll configure the IAP events as well as Ad Revenue if desired. Best practices for doing so are below and your Tapjoy account manager is available to assist. Specific setup issues should be addressed with your MMP representative.
Tapjoy’s ROAS reporting is based on install-date cohorts and Day 0, 1, 3 … 7, 14, 30, 60, and 90 metrics are available. For each of these Day X metrics, Ad Spend, Revenue (from IAP), Revenue from Ads, and ROAS are available directly through the GraphQL Reporting API, with selected metrics available in the Tapjoy Dashboard reporting. For example, the Day 3 ROAS metric is calculated from the sum of the revenue up through 3 days from install date divided by the associated Ad Spend for that cohort.
MMP-specific setup guides
Tapjoy ROAS reporting is officially supported for customers integrated with Adjust, Appsflyer, and Singular.
1. Adjust
Before you begin, you must set up Tapjoy as a partner: Set Up Tapjoy - Adjust Help Center
A. Adjust IAP Setup
In-App Revenue - Adjust Help Center
Mapped Events - Adjust Help Center
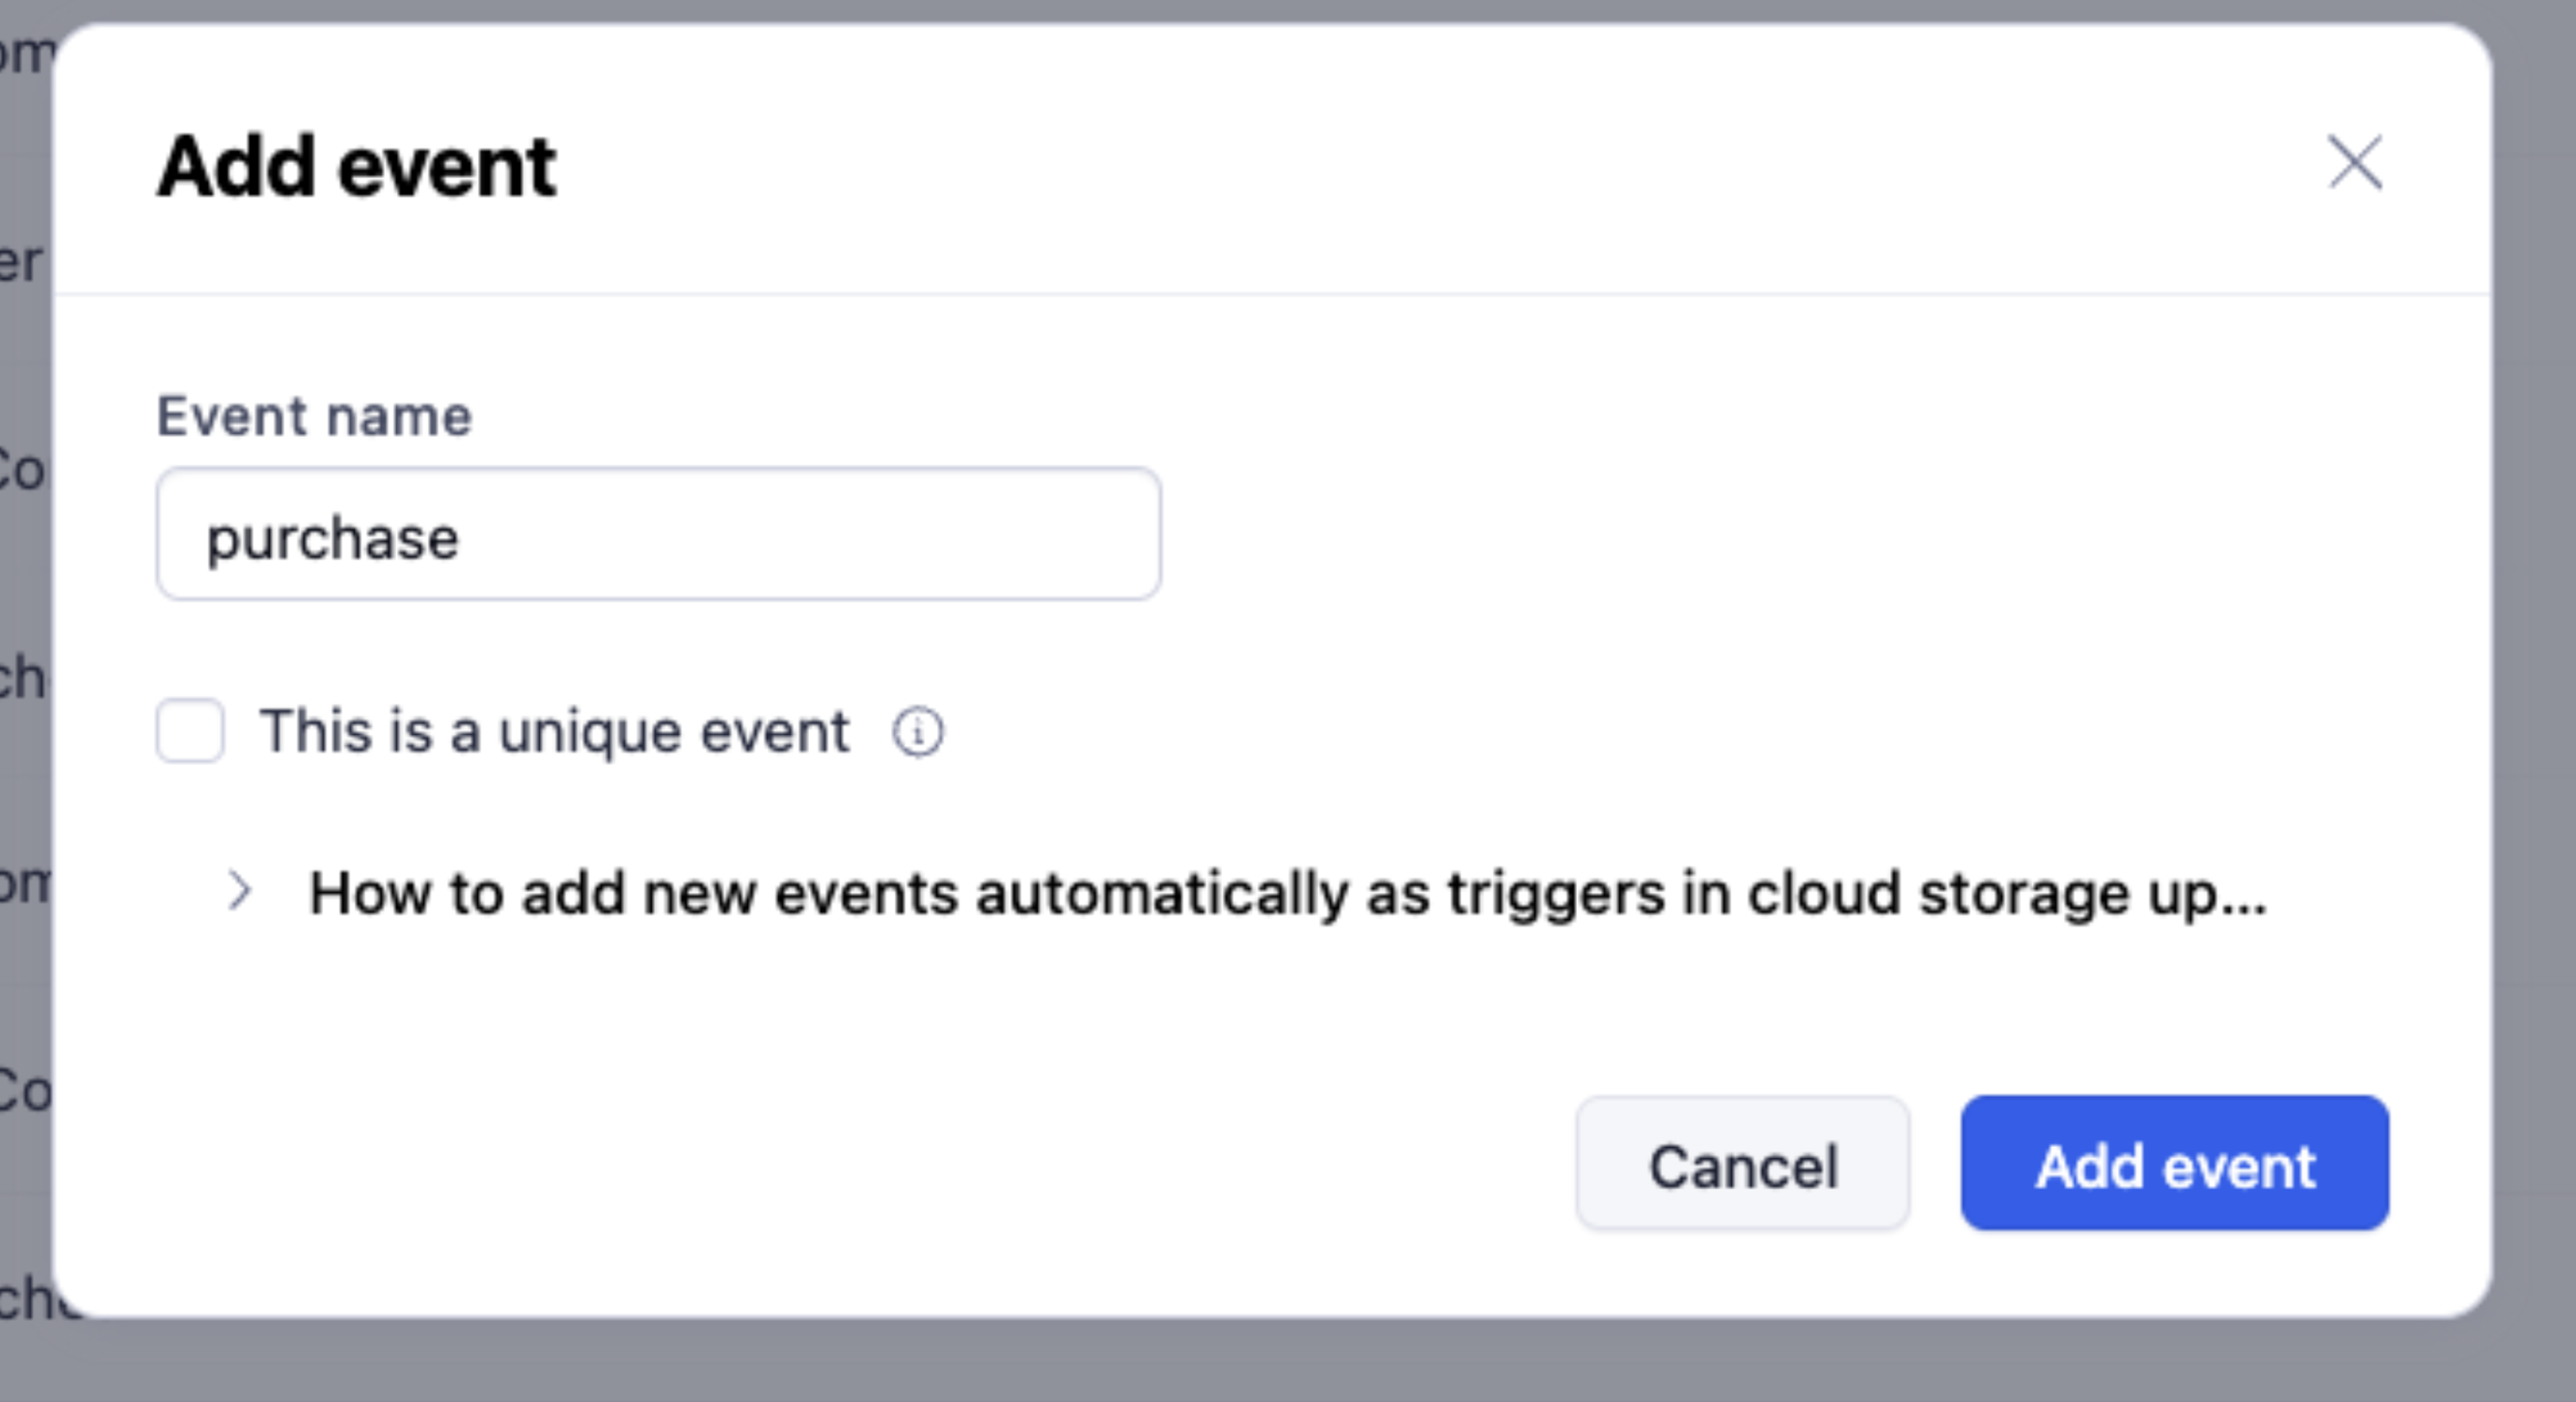
Step 1: Add your purchase events
- Login to the Adjust Dashboard.
- Under AppView, select All apps.
- Select the respective app.
- Select the Events tab.
- Click Add event.
- Enter your in-app Event name.
- Note: The setting "This is a unique event" does not apply to IAP events.
- Click the Add event button.
Step 2: Map your IAP events
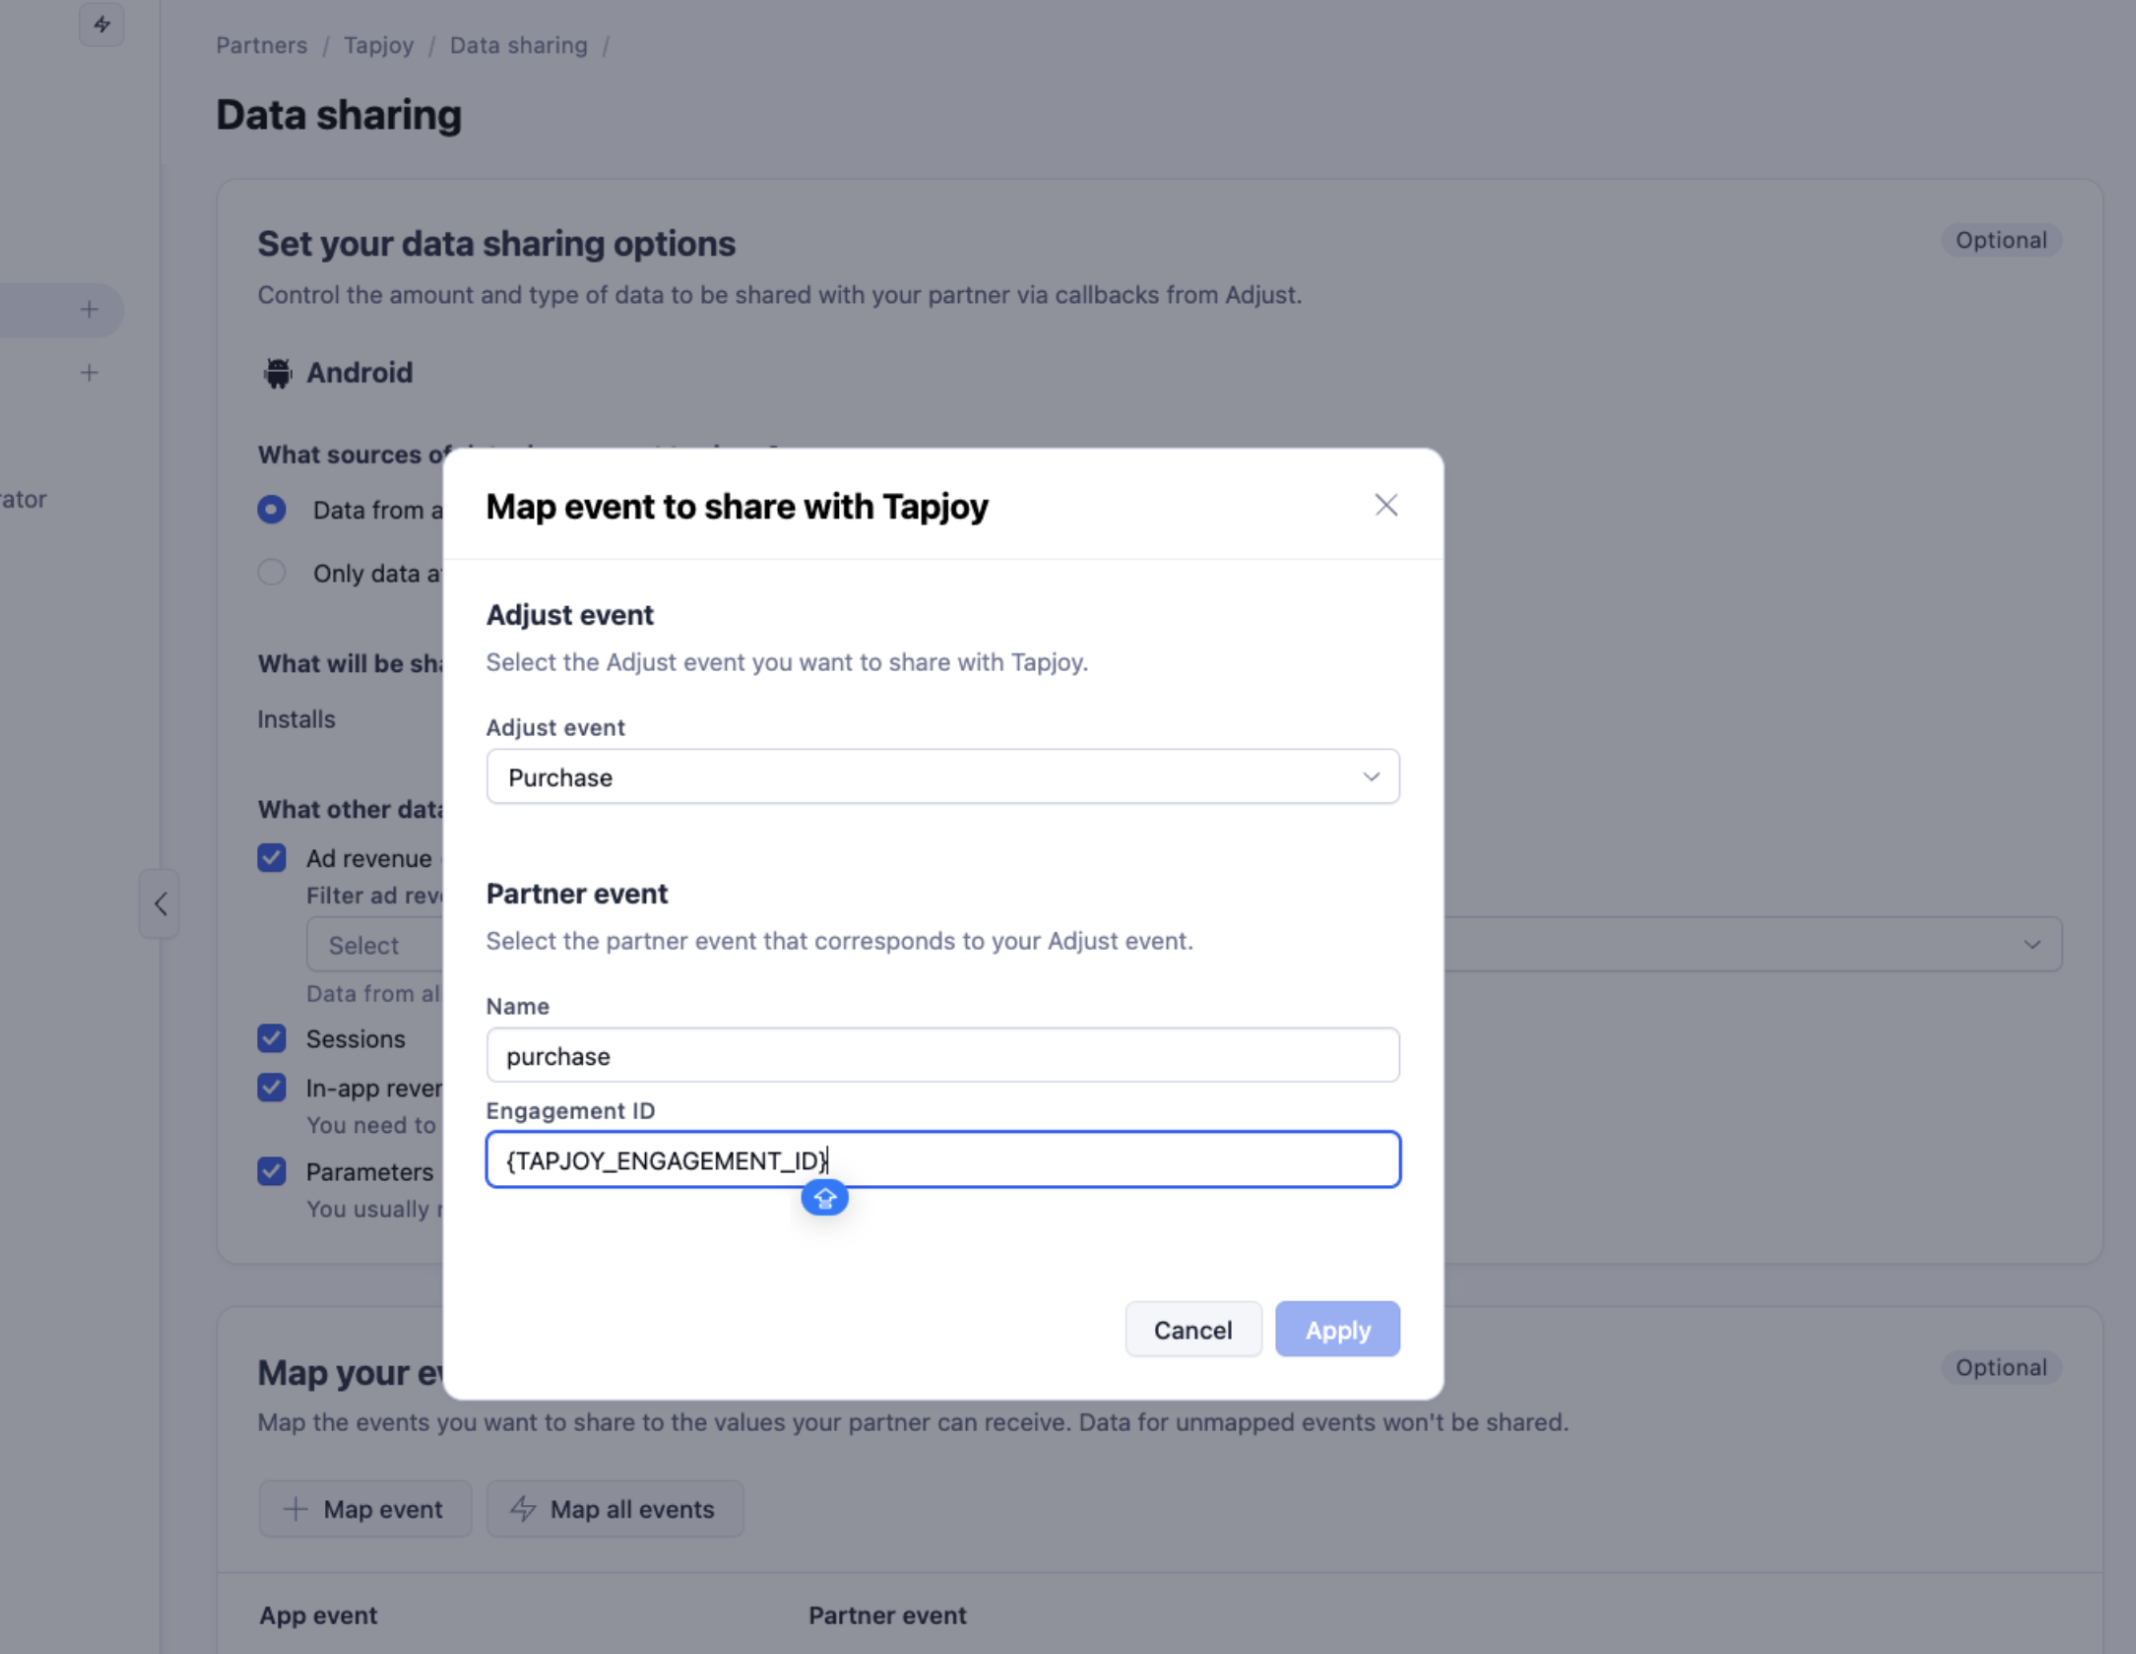
Once you’ve added your purchase events, you’ll need to map the events you want to share to Tapjoy. Data for unmapped events will not be shared.
- Click the +Map event button and select the SDK event in the Adjust Event dropdown.
- Under Name, enter the name of the SDK event.
- Under Engagement ID, enter the unique Tapjoy {engagement_id} that is generated.
- Click Apply.
- Repeat Steps 1-4 above until all events are added.
B. Adjust Ad Revenue Setup
Step 1: Map your ad revenue events
- Click the +Map event button and select the SDK event in the Adjust Event dropdown.
- Under Name, enter the name of the SDK event.
- Under Engagement ID, enter the unique Tapjoy {engagement_id} that is generated.
- Click Apply.
- Repeat Steps 1-4 above until all events are added.
Step 2: Enable Ad Revenue
- Under Campaign Lab, select Partners.
- Search for Tapjoy and click on the Tapjoy hyperlink in the search results under Channel.
- Click on the Data Sharing tab.
- Select the respective app.
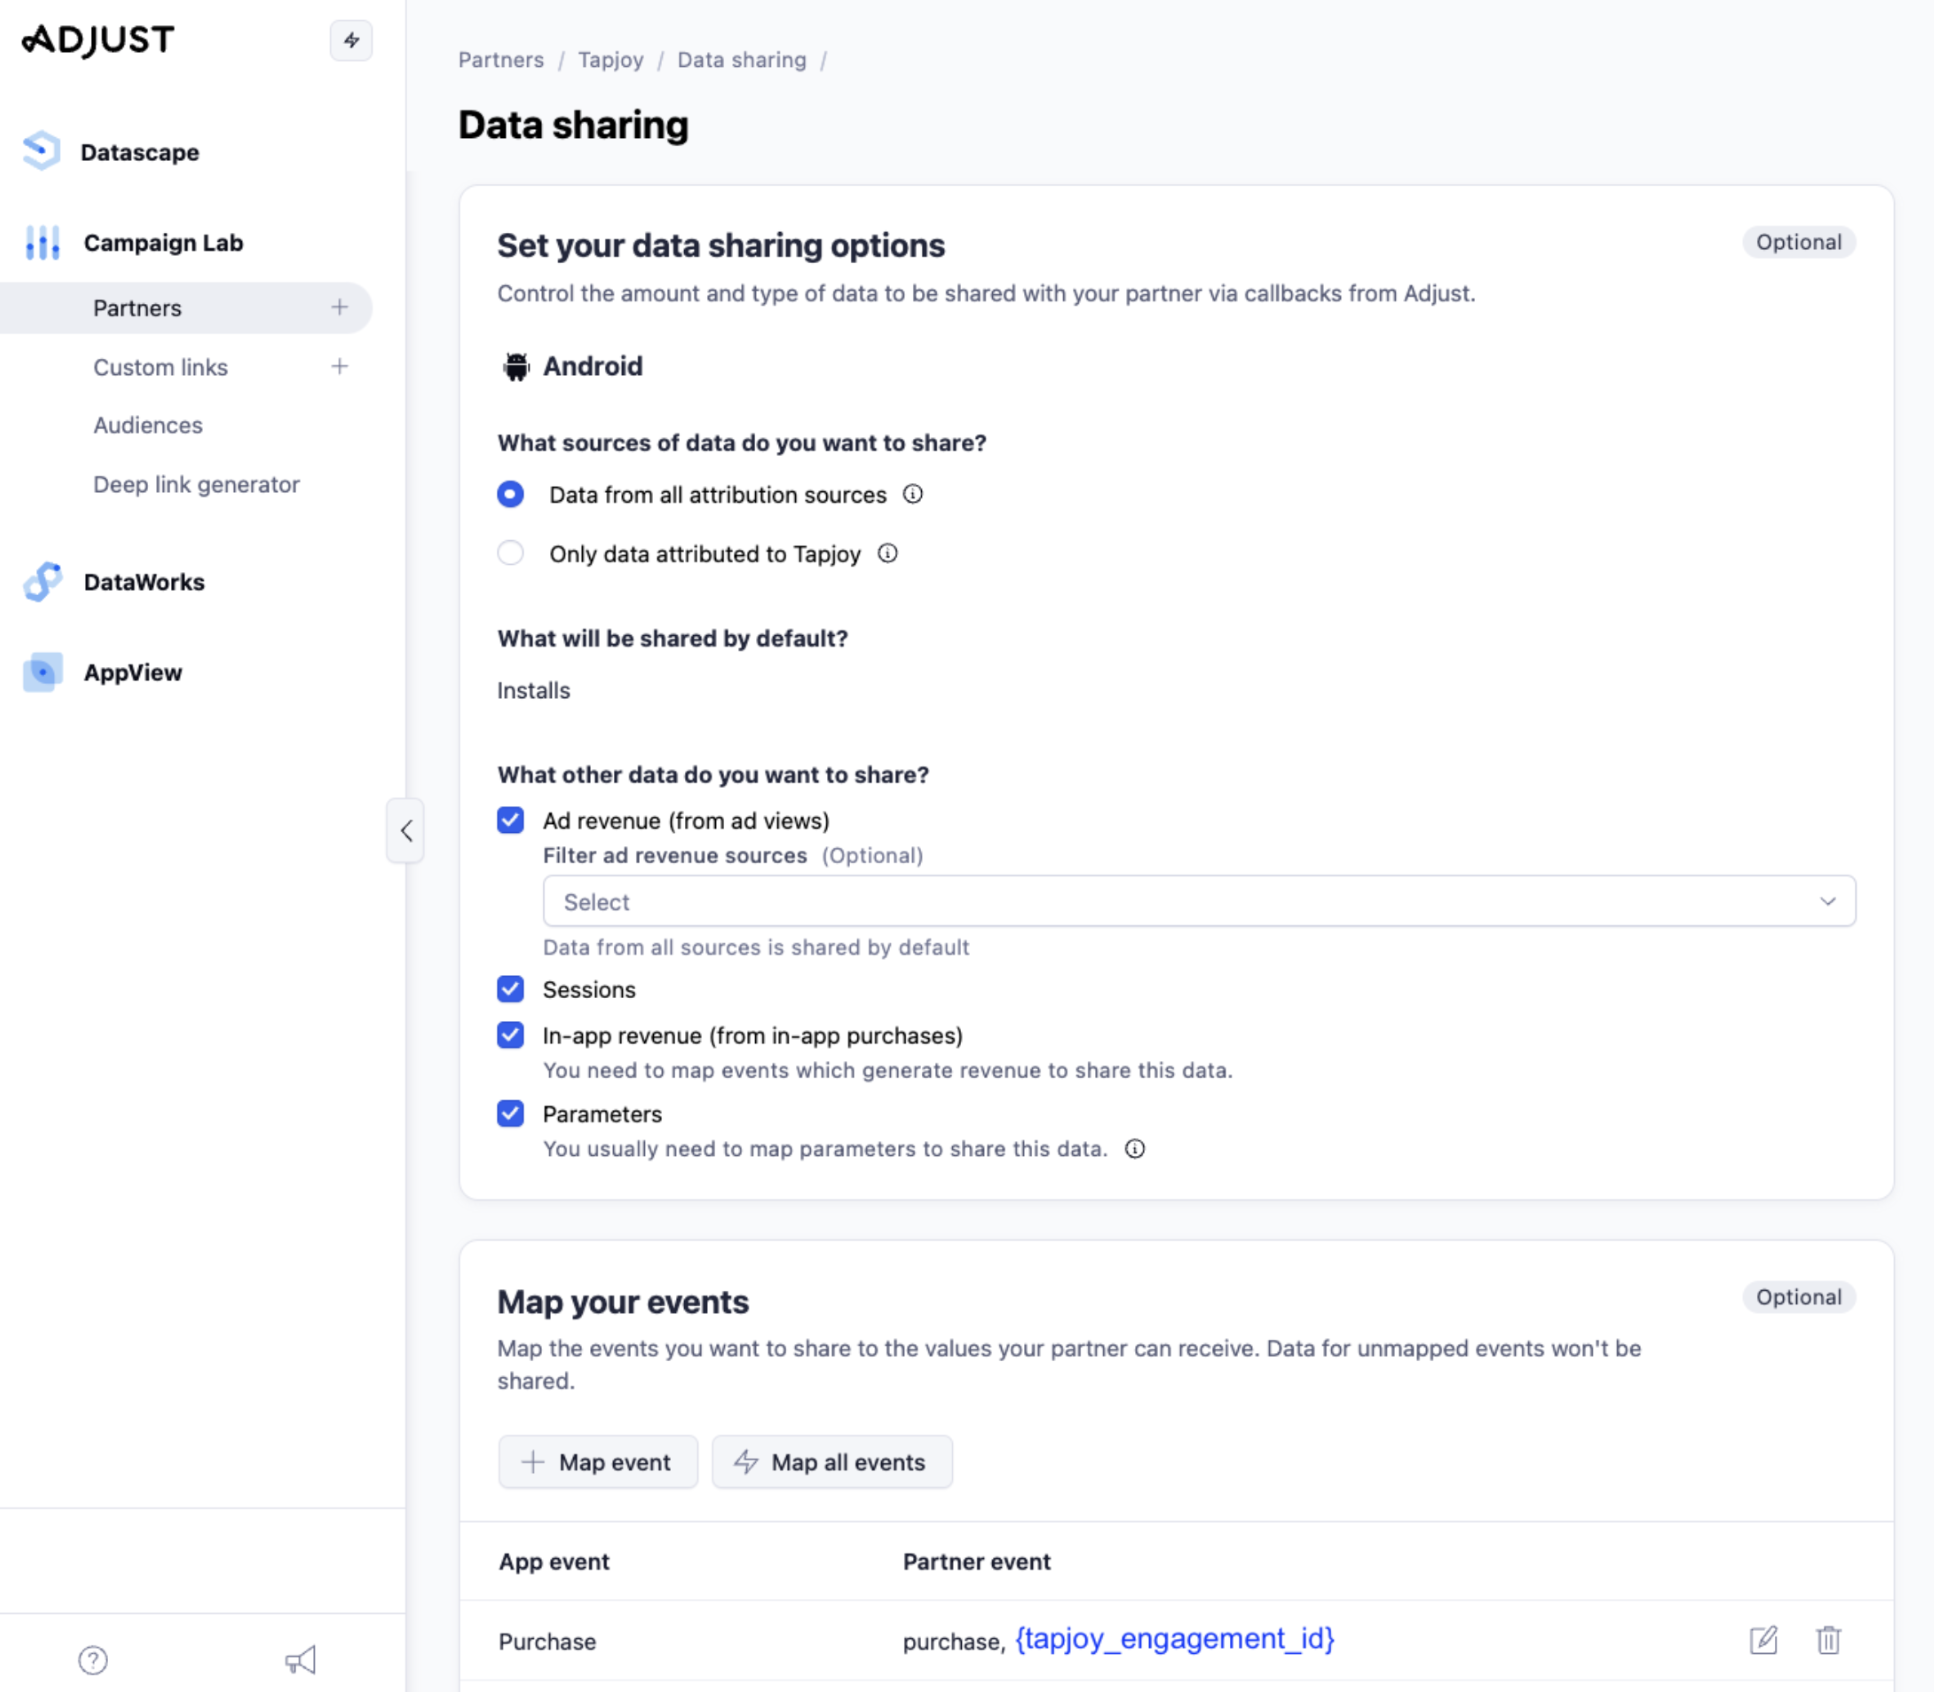
- Scroll down to Set your data sharing options.
- Check the Ad revenue clickbox.
- Note: Data from all sources is shared by default. If you specify any sources under the "Filter ad revenue sources" section, you must include Tapjoy in order for us to receive your data.
- Click on the SAVE button.
2. AppsFlyer
Before you begin, you must set up integration with Tapjoy: Tapjoy Campaign Configuration – AppsFlyer Help Center
A. AppsFlyer IAP Setup
In-App Events - AppsFlyer Help Center
Add your IAP Revenue events
- In the AppsFlyer Dashboard, navigate to the side menu and select Collaborate > Active Integrations.
- Use the search bar to find and select Tapjoy.
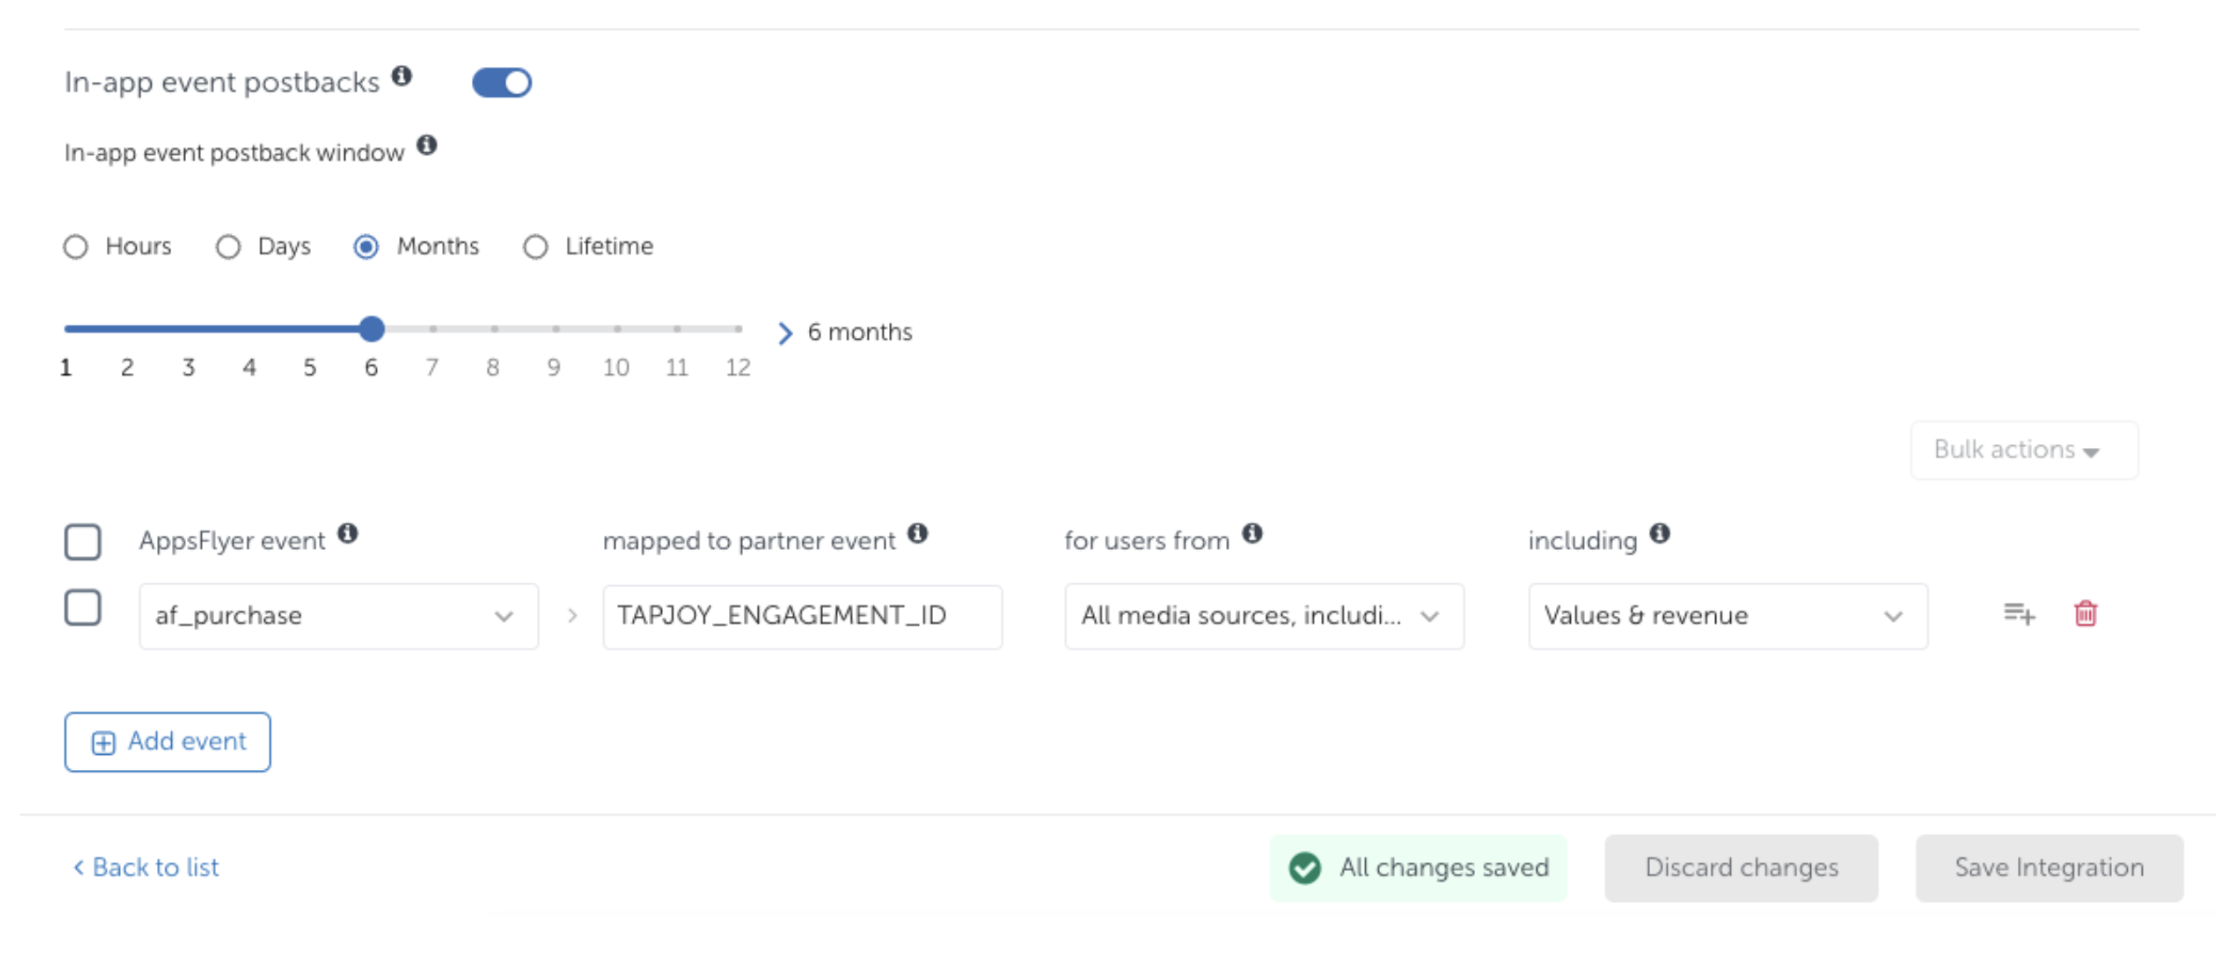
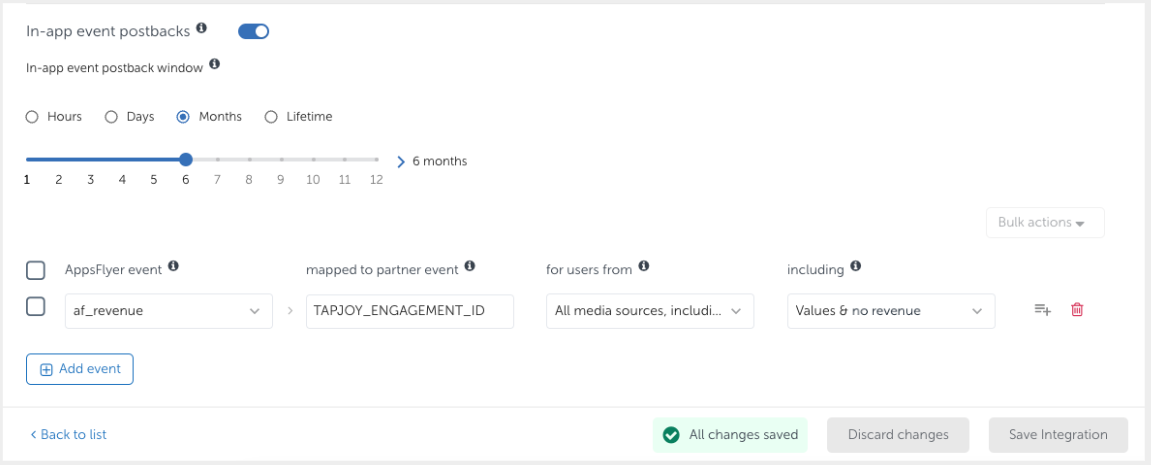
- Under the Integration tab, scroll down and select +Add Event to map the purchase events you would like to send.
- In the AppsFlyer event column, select the respective post-install event from the dropdown.
- AppsFlyer recommends using the predefined event "af_purchase" for In-App Purchases.
- Under the Partner Event Identifier column (labeled "mapped to partner event"), add the Tapjoy generated engagement_id.
- Select your preferred sending option in the for users from column.
- Under the including column, select Values & revenue for your In-App Purchase events.
- Click Save integration.
B. AppsFlyer Ad Revenue Setup
Advertisers must be an ROI360 advanced customer in order to send ad revenue data. To learn more, see AppsFlyer's Ad Revenue Attribution Guide
Share Ad Revenue - AppsFlyer Help Center
In-App Events - AppsFlyer Help Center
Step 1: Add your Ad Revenue events
- In the AppsFlyer Dashboard, navigate to the side menu and select Collaborate > Active Integrations.
- Use the search bar to find and select Tapjoy.
- Under the Integration tab, scroll down and select +Add Event to map the revenue events you would like to send.
- In the AppsFlyer event column, select the respective post-install event from the dropdown.
- AppsFlyer recommends using the predefined event "af_revenue" for user generated Ad Revenue events.
- Under the Partner Event Identifier column (labeled "mapped to partner event"), add the Tapjoy generated engagement_id.
- Select your preferred sending option in the for users from column.
- Under the including column, select Values & no revenue for your Ad Revenue events.
- Click Save integration.
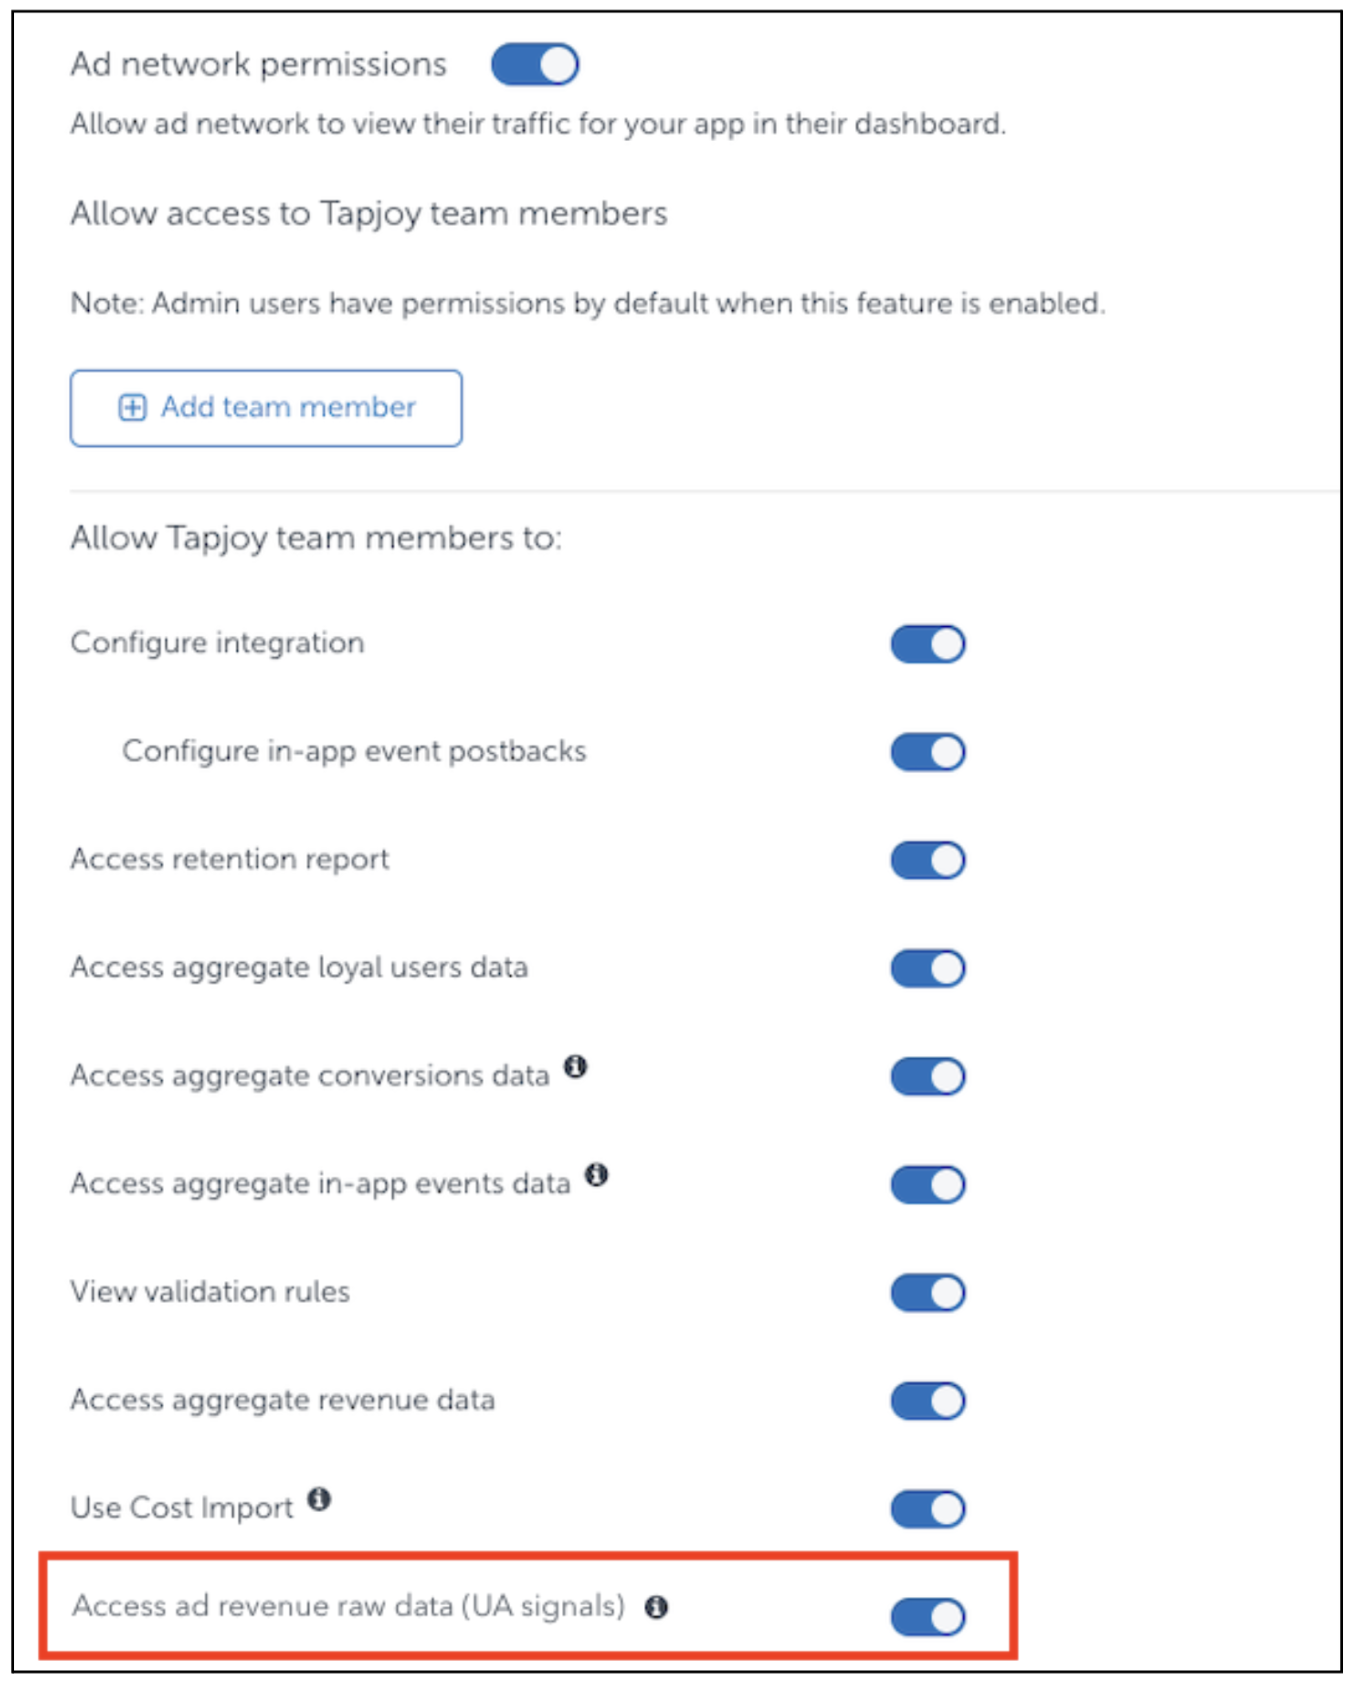
Step 2: Enable Ad Revenue Permissions
In order for Tapjoy to receive your ad revenue data through the Data Locker, you must enable us to view the report under the Permissions tab.
- From the side menu, select Collaborate > Active Integrations.
- Use the search bar to find and select Tapjoy.
- Navigate to the Permissions tab.
- Turn the Ad network permissions toggle on.
- Turn the Access ad revenue raw data (UA signals) toggle on.
- Click Save.
3. Singular
A. Singular IAP Setup
Set Up Tapjoy - Singular Help Center
General Instructions on how to set-up a Partner
The SDK event list includes the events _ IAP _ and _ REVENUE_. _ IAP _ is any in-app purchase event that wasn't given a custom name. _ REVENUE_n includes:
- All in-app purchase events (_ IAP _ + events with custom names, if any).
- Ad revenue events reported by the SDK (if you have set up ad revenue attribution using the method of sending SDK events).
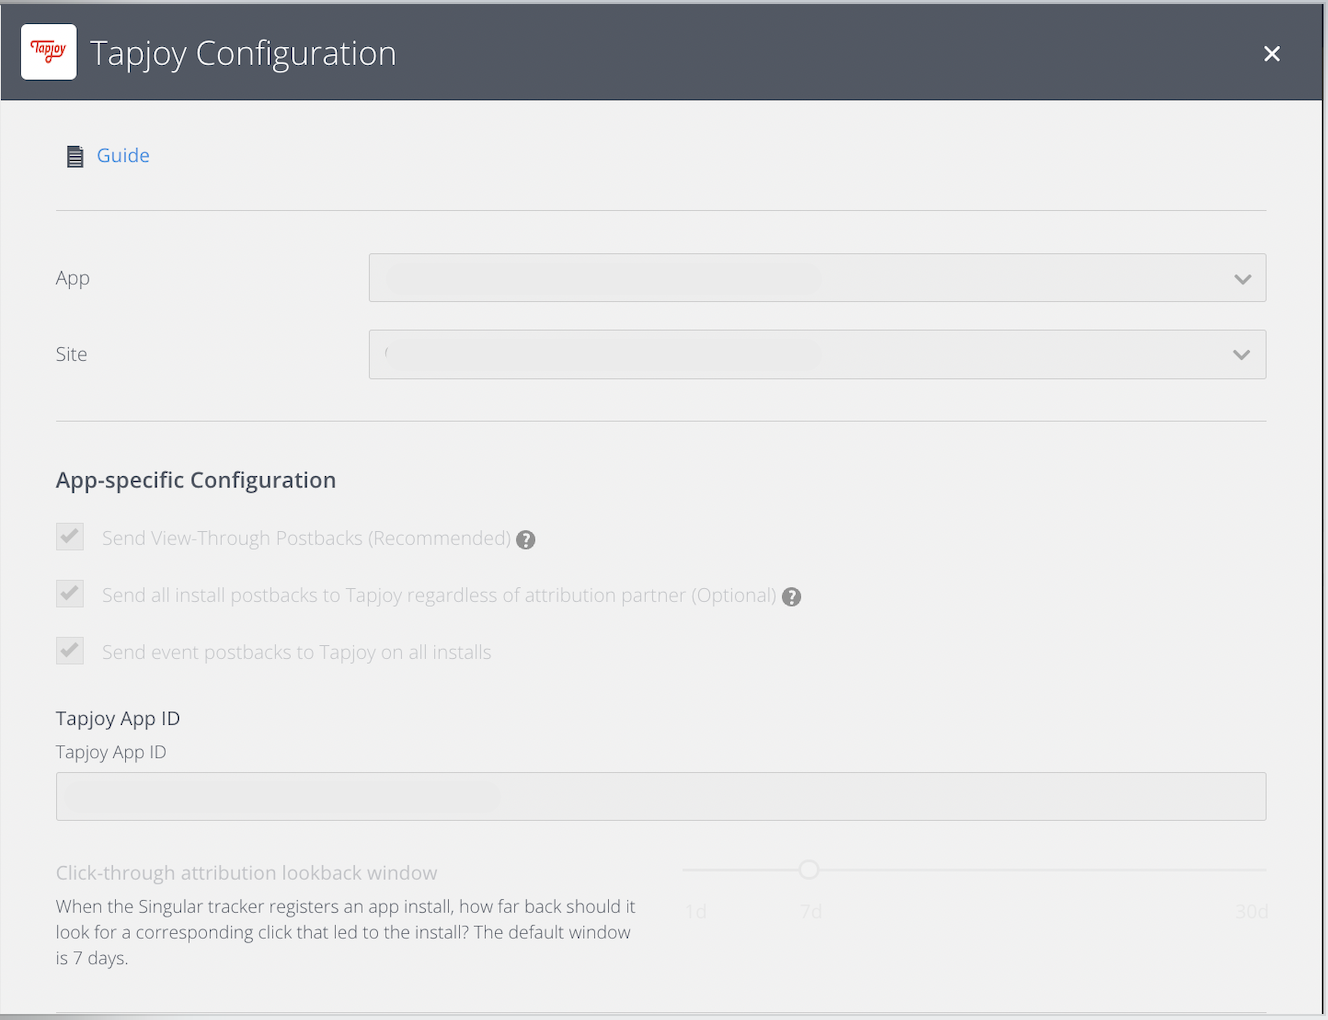
Before Singular can track installs and events for an ad network, you need to set up Tapjoy in the Attribution > Partner Configuration page.
- Log in to the Singular dashboard. Click on Attribution > Partner Configuration on the left hand side. Search for Tapjoy in the text box and select from the list.
- The Tapjoy Configuration window will open. In the dropdown, select the App you want to configure. **NOTE: Each app is configured separately.
- Under App-specific Configuration, check-off each of the following:
- Send all install postbacks to Tapjoy regardless of attribution partner
- Send event postbacks to Tapjoy on all installs
- Paste the Tapjoy generated ID under Tapjoy App ID.
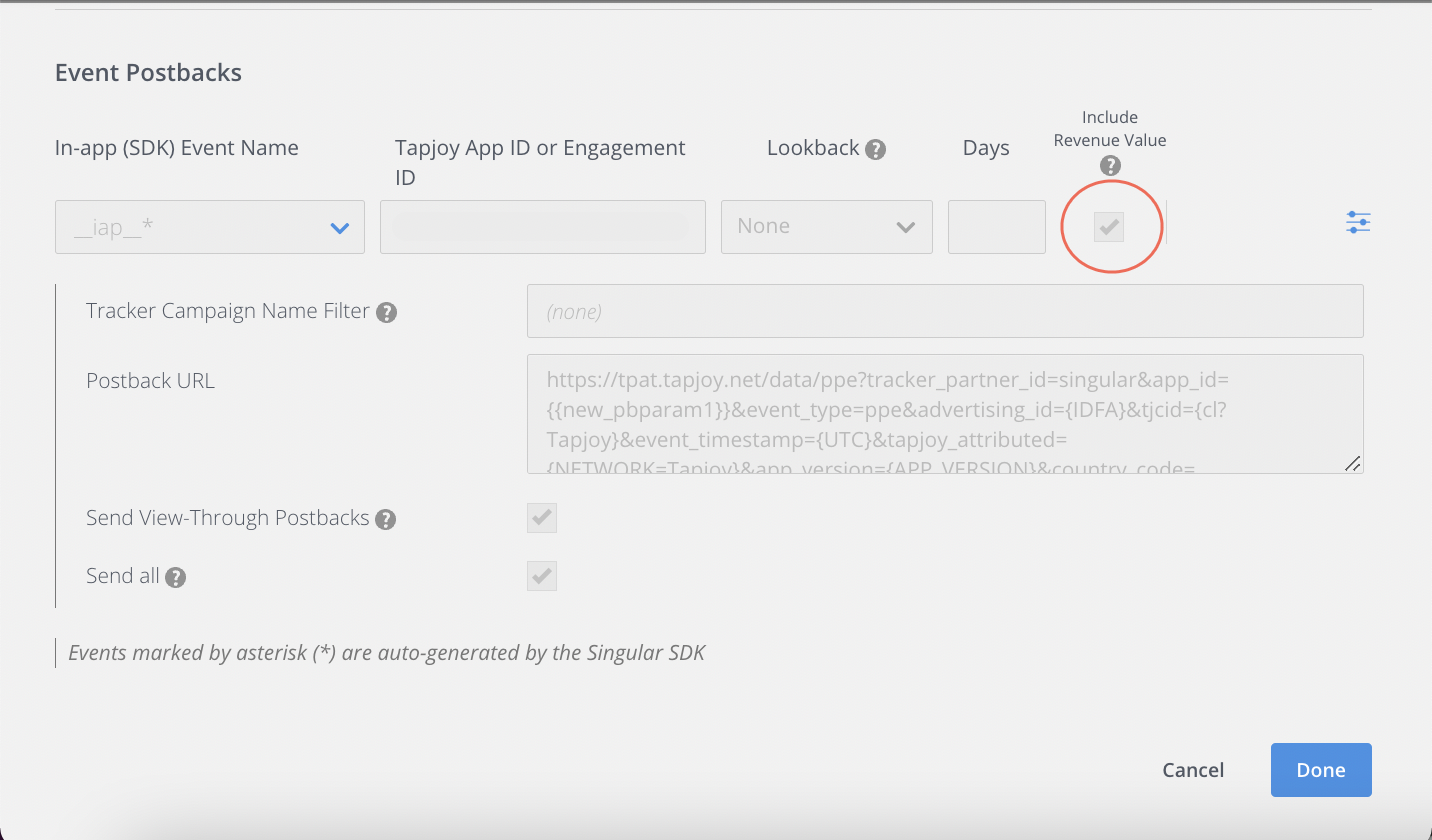
- Continue to scroll further down to Event Postback and in the dropdown, select one of the following:
- All: Send this partner postbacks about all events that users trigger in your app, whether the events are attributed to this partner or not.
- Only if install was attributed to Tapjoy: Send event postbacks when the respective install was attributed to this partner
- Next add the _ IAP _ event name and ☑️include revenue value.
- Click Done.
B. Singular Ad Revenue Setup
Onboarding Guide for Ad Revenue Attribution
Before Singular can track installs and events for an ad network, you need to set up Tapjoy in the Attribution > Partner Configuration page.
- Log in to the Singular dashboard. Click on Attribution > Partner Configuration on the left hand side. Search for Tapjoy in the text box and select from the list.
- The Tapjoy Configuration window will open. In the dropdown, select the App you want to configure. NOTE: Each app is configured separately.
- Under App-specific Configuration, check-off each of the following:
- Send all install postbacks to Tapjoy regardless of attribution partner
- Send event postbacks to Tapjoy on all installs
- Paste the Tapjoy generated ID under Tapjoy App ID.
- Continue to scroll further down to Event Postback and in the dropdown, select one of the following:
- All: Send this partner postbacks about all events that users trigger in your app, whether the events are attributed to this partner or not.
- Only if install was attributed to Tapjoy: Send event postbacks when the respective install was attributed to this partner
- Next add the _ REVENUE _ event name and include revenue value.
- Click Done.